
Welcome devs, I recently faced an issue where if I didn't specify any android:inputType for EditText then keyboard capitalisation did not correctly show. The deeper problem was that I always forgot to include that attribute. So I decided to use a lint check which would fail my build if any of my EditText does not have the android:inputType attribute.
Since there was no such thing included in pre-provided checks I decided to write a custom lint rule. What follows is a guide on how to write a lint-check which goes checks all of our layout files and flags any EditText without android:inputType attribute.
What is Android lint?
Android lint is a tool which provides us static code-analysis (it does not need to run the application to identify potential problems). The Android SDK already provides us with some pre-made lint checks, but the best part is that it allows us to write our own custom lint checks.
Writing a custom lint check
We will be writing a lint check which checks whether each EditText, androidx.appcompat.widget.AppCompatEditText and android.support.v7.widget.AppCompatEditText has the android:inputType attribute defined or not.
This lint check is set to fail the build when it finds any of the above element not containing the android:inputType attribute.
Create a new Library Module
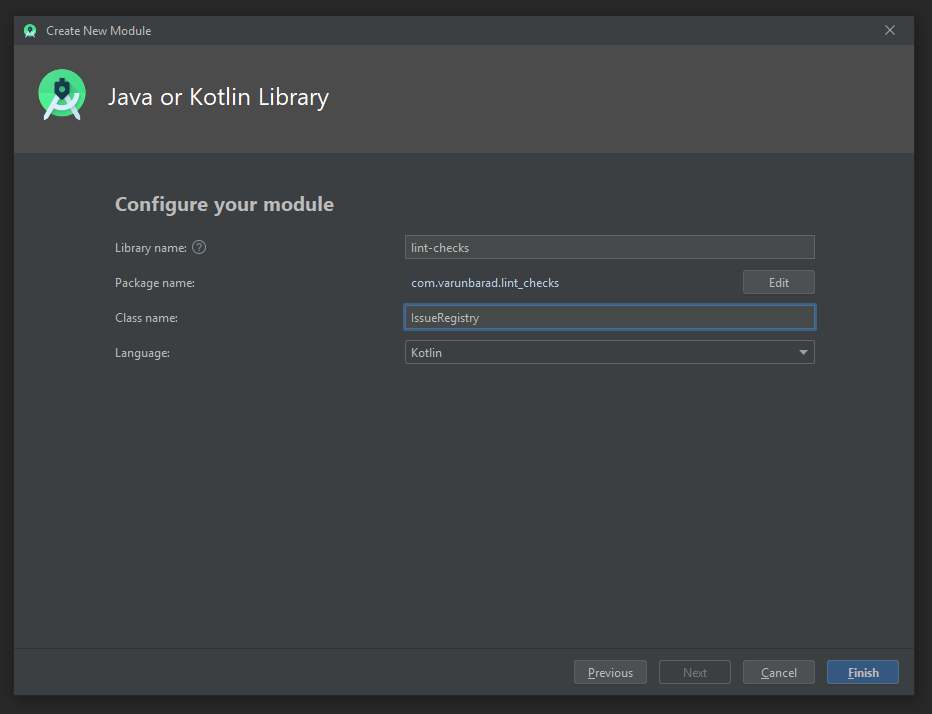
In the project for which you want to write the lint check, add a new "Java or Kotlin Library" module.
- For Library name you can put anything but I have used
lint-checks - For Class name put
LintRegistry(we will get to the reasoning later) - I have selected Kotlin as the language
Add dependencies in Gradle
You only need 3 dependencies in your lint-checks module's build.gradle and all of them need to be only compileOnly
dependencies {
    compileOnly "org.jetbrains.kotlin:kotlin-stdlib-jdk7:1.3.61"
    compileOnly "com.android.tools.lint:lint-api:26.6.0"
    compileOnly "com.android.tools.lint:lint-checks:26.6.0"
}
Create the detector
Now let's write the class which will actually detect the issues. We create a new class named InputTypeDetector which extends from LayoutDetector
class InputTypeDetector : LayoutDetector() {
   ...
}
Now we specify the Issue that we want our detector to raise when we find and edit-text without input-type. We declare it as a property under companion object of this class (and mark it with @JvmStatic so that it appears as static field when accessed from Java code).
companion object {
    @JvmStatic
    internal val ISSUE_MISSING_INPUT_TYPE = Issue.create(
        id = "MissingInputType",
        briefDescription = "Specify inputType attribute to get proper keyboard shown by system.",
        explanation = "You should specify an inputType for each EditText so that you can get the proper keyboard to be shown by system.",
        category = Category.USABILITY,
        priority = 8,
        severity = Severity.ERROR,
        implementation = Implementation(
            InputTypeDetector::class.java,
            Scope.ALL_RESOURCES_SCOPE
        )
    ).addMoreInfo("https://developer.android.com/training/keyboard-input/style")
}
The important things here are:
id- The name which is shown in the lint reportseverity- There are many types of severity, here we have specifiedERRORas we want the build to fail when we find this issueimplementation- The implementation defines which XML files to scan for this issue and which detector to use to detect this issue.
After that we override the function getApplicableElements, where we specify for which elements we want this detector to be run (so that our detector doesn't get unnecessarily called for every element).
override fun getApplicableElements(): Collection<String>? {
    return listOf(
        SdkConstants.EDIT_TEXT,
        "androidx.appcompat.widget.AppCompatEditText",
        "android.support.v7.widget.AppCompatEditText"
    )
}
Since we only want our detector to be called for EditText, androidx.appcompat.widget.AppCompatEditText and android.support.v7.widget.AppCompatEditText we return a list of all of them.
The last thing remaining to be done in detector is to actually determine if any given element has the problem or not. For that we override the visitElement method.
override fun visitElement(context: XmlContext, element: Element) {
    if (!element.hasAttribute(SdkConstants.ATTR_INPUT_TYPE)) { // Check if the element has the `android:inputType` attribute
        context.report(
            issue = ISSUE_MISSING_INPUT_TYPE, // The issue that we defined above
            location = context.getLocation(element),
            message = ISSUE_MISSING_INPUT_TYPE.getExplanation(TextFormat.TEXT)
        )
    }
}
Here we are doing 2 things
- Checking if given element has the
android:inputTypeattribute or not - Raise the issue if the
android:inputTypeattribute is not present
Note: One thing you might have noticed is the location parameter, that is used by the lint tool to show exactly where any issue is reported.
Registering the Issue
Now we have declared the issue and corresponding detector, but we need to register them at a central location so that the lint tool knows that it has to execute these checks too. For that we go back to our LintRegistry class that we declared earlier when creating the lint-checks module.
We extend that class from IssueRegistry class and override a couple of properties.
class LintRegistry : IssueRegistry() {
    override val api: Int
        get() = CURRENT_API

    override val issues: List<Issue>
        get() = listOf(
            InputTypeDetector.ISSUE_MISSING_INPUT_TYPE
        )
}
Any future issues that we declare/write are to be added to this issues property list.
Registering our Issue Registry
We now need to declare this class within the manifest of our JAR. We do this in our build script. Add the following block under your lint-checks module's build.gradle file
jar {
    manifest {
        // Format is
        // attributes("Lint-Registry-v2": "<fully-qualified-class-name-of-your-issue-registry>")
        attributes("Lint-Registry-v2": "com.varunbarad.androidlintchecks.LintRegistry")
    }
}
Integrating our custom lint check module into our project
In your app module go and add a lintChecks dependency on your lint-checks module like this
dependencies {
    lintChecks project(":lint-checks")
    ...
}
Run the lint checks
That was all that was needed to write your custom lint check. Now whenever you run a lint check using gradle, it will also check whether your code passes our custom lint checks or not.
# Command to run lint check
./gradlew lint
Want to discuss this or any other interesting thing, hit me up on Twitter @varun_barad.
Edits
- 2020-03-02: Add the step of "Registering our Issue Registry"